In the dining room there was a empty corner.
When the dresser moved into the guest room and the desk moved to the basement we had ourselves a spare chair. We just had family in town and with one of our four dining chairs taken over by a booster seat it was nice to have a spare chair around. So it came to living in the dining room.
I put a temporary pillow on because I thought it softened it up a little. By temporary I mean fabric wrapped around a pillow I took from the guest room. It's a really pretty chair. Look at the cane seat.
I kinda like the idea of hanging something from the back of the chair. Like my heart wreath maybe?
Maybe too much? Not sure yet. I'm glad spare chair came to live out here. She didn't get a whole lot of attention pushed under a desk in the guest room.
Oh, look WHO came to live in the dining room too.
Happy Friday!
French Country Cottage
At The Picket Fence
Showing posts with label owl print. Show all posts
Friday, February 17, 2012
Wednesday, February 8, 2012
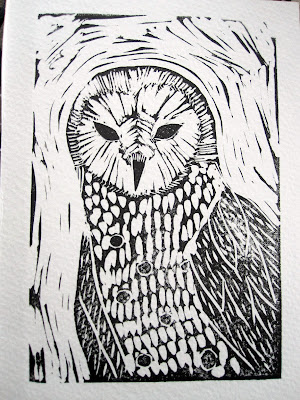
barn owl
I'm trying to keep up with my drawing so I went down to the basement yesterday afternoon to get a pad and I spotted my block printing kit I had bought 2 years ago. I only used it once for a squirrel print I did as a gift last Christmas. I took some lithography classes in college and loved printmaking but lithography with the metal plates and chemicals and giant press was not going to happen at home. So, I found the block printing kit that I could use to do a linocut and thought "yeah, I could do that at home"! Then of course it sat in my drawer for a year. When I did my squirrel print last year I used the linoleum block material that came in the kit and it was pretty hard to carve. I stabbed myself in the hand within 5 minutes of starting. Maybe that is why I haven't done it again in a year? The other material that came with the kit was called easy carve.
Below you can see the pink easy carve. This is not a sponsored post about easy carve by any means! Just my enthusiasm at finding a new art material that I enjoy. The blue handled tool is for carving. You can see the various tips for carving and my preliminary sketch for my owl. Owls are my little guy's unofficial mascot. We have a real fondness for them around here.
You can draw right on the speedy carve and get to cutting. This speedy carve material is much easier to carve than the classic linoleum block. It smoothly cut away and was so nice to work with. It is tricky for me to work in the negative. I had to keep reminding myself how it worked. Everything you cut away it what will not take the ink. Everything you leave is what will take the ink and transfer to your print, make sense? It is really hard for me to wrap my brain around this while I'm working.
So I carved and cut and cut and carved
and then I thought she was looking rather nice. So down in the basement we went for the printing part.
I tore some small sheets of paper. A thicker paper with a bit of a tooth works best.
The kit comes with a roller or brayer and an inking plate. so you squeeze out a bit of ink on your plate and roll it out so your brayer is all loaded up with a nice coat of ink.
Then you roll that ink over miss owl.
Then you lay your paper on top and press. I used a pencil to roll all over the paper to try to get even pressure on it. Last time I used the back of a wooden spoon. It is a little tricky to get it nice and dark and even. That is where a press makes all the difference but you work with what ya got right?
I made a couple prints
They are all a smidge different. Here is another
I really enjoyed myself and will be getting more easy carve asap. I liked working small and the carving and printing took place in the time of an afternoon nap which is perfection for me. The ink is water based so washed away easily and the carving can be re-inked and printed again. There is something peacefully methodical about the carving and the printing.
Give it a try. No art training necessary. If you ever made a potato stamp as a kid then you are on your way!
Savvy southern Style
It's Overflowing
Delightful Order
The Shabby Creek Cottage
At the picket fence
French Country Cottage
funky junk interiors
Below you can see the pink easy carve. This is not a sponsored post about easy carve by any means! Just my enthusiasm at finding a new art material that I enjoy. The blue handled tool is for carving. You can see the various tips for carving and my preliminary sketch for my owl. Owls are my little guy's unofficial mascot. We have a real fondness for them around here.
You can draw right on the speedy carve and get to cutting. This speedy carve material is much easier to carve than the classic linoleum block. It smoothly cut away and was so nice to work with. It is tricky for me to work in the negative. I had to keep reminding myself how it worked. Everything you cut away it what will not take the ink. Everything you leave is what will take the ink and transfer to your print, make sense? It is really hard for me to wrap my brain around this while I'm working.
So I carved and cut and cut and carved
and then I thought she was looking rather nice. So down in the basement we went for the printing part.
I tore some small sheets of paper. A thicker paper with a bit of a tooth works best.
The kit comes with a roller or brayer and an inking plate. so you squeeze out a bit of ink on your plate and roll it out so your brayer is all loaded up with a nice coat of ink.
Then you roll that ink over miss owl.
Then you lay your paper on top and press. I used a pencil to roll all over the paper to try to get even pressure on it. Last time I used the back of a wooden spoon. It is a little tricky to get it nice and dark and even. That is where a press makes all the difference but you work with what ya got right?
I made a couple prints
They are all a smidge different. Here is another
I really enjoyed myself and will be getting more easy carve asap. I liked working small and the carving and printing took place in the time of an afternoon nap which is perfection for me. The ink is water based so washed away easily and the carving can be re-inked and printed again. There is something peacefully methodical about the carving and the printing.
Give it a try. No art training necessary. If you ever made a potato stamp as a kid then you are on your way!
Savvy southern Style
It's Overflowing
Delightful Order
The Shabby Creek Cottage
At the picket fence
French Country Cottage
funky junk interiors
Subscribe to:
Posts (Atom)